Monday 30 November 2020

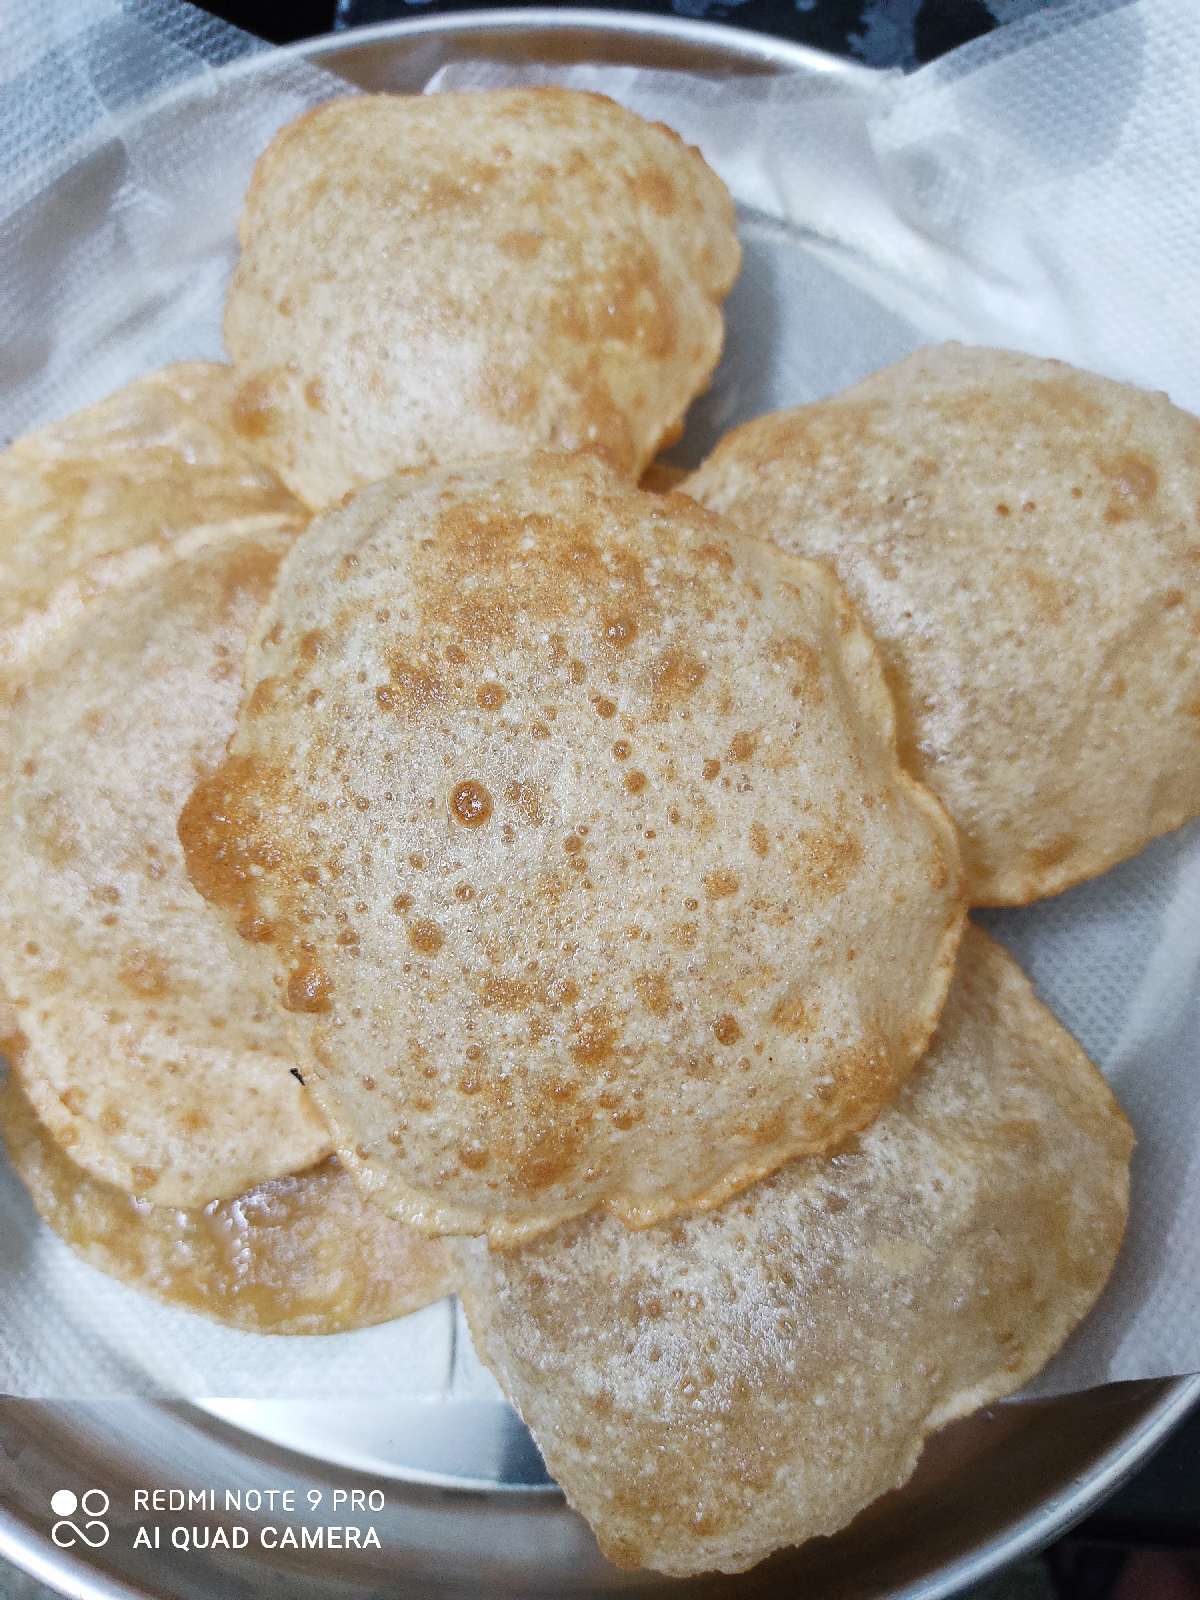
Puri


Recipe (serves 5-6)
Ingredients 
Wheat flour - 2 cups 
Chirotti rava - 2 tbsp
Salt - 1 tsp
Water - to knead
Oil - to fry + a couple of tsp to knead and roll

Method

Take two cup of whole wheat flour. Add a couple of table spoons of fine chirotti rava. Add a tsp of salt. Mix the flour, rava, and salt well. Add water and knead the dough tight. It should not be a soft dough else the puris will absorb too much oil. 

Add a couple of teaspoons of oil into the dough and let is rest for about 15 mins.

Heat oil in a heavy bottomed vessel. 

In the meanwhile, start rolling out the puris. 

With greasy hands, pinch a bit of dough, about a tablespoon size, and roll it into an even disc, smearing some oil on the dough if needed. 

When the oil is hot enough dip the disc into the oil and press the sides down when it rises up. Once the puri has puffed up, flip it over and gently hold the puri down so it cooks. 

Once the puri has fried on both sides, remove it and place on a kitchen towel to drain the excess oil. 

Serve hot with Aloo Bhaji

Tips:
  • The chirotti helps in making the puris crisp. 
  • Kneading a tight dough makes the puris absorb less oil. 
  • Using oil to roll out the puris instead of dry flour, keeps the puris clean, instead of the dry flour getting into the oil while frying. 
  • To get the puris to puff, try to gently roll them as smooth and even as possible, but without pressing down tight. 
  • The oil should be hot. If not the puris will not puff up. If the oil is too hot, it will start browning too fast
  • When the puri starts rising up, press the puris gently on the sides to dip it into the oil. That helps it in puffing up. 
  • After flipping the puri, try to gently keep it pressed in the oil, to ensure even cooking.
Verdict
Quick and easy to make and a winner with kids. It is always a welcome idea, but I do limit the frequency of making puris. This is a once in a while delicacy we indulge in. 

Aloo Bhaji


Chilly winters have a way of increasing the appetite and yearning for spicy fried food. Our festivals align perfectly with this season giving us opportunity to indulge in our whims as we please. 

Puris with potatoes or chole are such a welcome menu on a cold winter evening. 

Before winter slips us by quickly, I wanted to document the perfect recipe for perfect evening meal. 

Recipe (serves 4)
Ingredients
Potatoes - 4 large 
Green peas - 1/2 cup 
Onions - chopped 
Green chillies - 2-3 
Salt - to taste 
Turmeric powder - 1 pinch

Tempering Mustard seeds - 1/2 tspCurry leaves - 6-8 Oil - 2 tsp + 1 tsp 
Coriander leaves - for garnishing

Method
Boil the potatoes and green peas. Peel the boiled potatoes and mash them up coarsely. If you prefer not having sizeable bite sized pieces of potatoes, then mash them up well. 
Heat 2 tsp oil in a heavy pan. When the oil is hot, add the mustard seeds and curry leaves. When the seeds begin to sputter, add in the chopped onions and green chillies. Fry until transparent. Add turmeric and continue frying, adding another tsp of oil if needed. 
When the onions are tender, add the mashed potatoes, green peas and mix them all up. Add salt to taste, give it a stir and simmer for a few minutes.  Take it off the heat and garnish with chopped coriander leaves. 
Serve hot with puri

Verdict
Anything that piques the kid's interest in food and gets them to polish their plates is a winning recipe.
I rest my case. 

Sunday 18 October 2020

Egg pockets using sandwich maker


It was a delightful to discover a different way to use a the sandwich maker when I came across this recipe for Pillow cakes. One Sunday when the sandwich maker was used for a lazy Sunday breakfast for the kids, in no time I was rushing to wind up lunch preparations. Being short of time, I thought of skipping sabzi and just making omelettes. Then it struck me, how about I use the sandwich maker for the omelette instead. And that is how this recipe came about. Well, the same recipe as a masala omelette but prepared and presented in a different way. 


Recipe (Makes 12 pockets):

Ingredients:
Eggs - 6
Onion, finely chopped - 1 small
Green chillies, finely chopped - 2
Tomato - deseeded, finely chopped - 1/2 medium sized
Salt - to taste 
Coriander, finely chopped - 1 tbsp

Method:
Crack the eggs into a bowl. Whisk until frothy. Add the chopped onions, chillies, tomato, salt and coriander. 
Whisk until incorporated. 

Heat the sandwich maker. Brush oil generously and once ready, use a spoon to fill in the egg mix in the moulds. close the sandwich maker and let it cook for a minute at the most. 

Remove and brush some oil before making the next batch. 


Verdict: A fun way to present the regular omelette. 


Friday 16 October 2020

Sweet Pongal


Sweet pongal or Sakkarai pongal is a usually served as neivedyam on pooja days. I usually say, the menu as offering to the Almighty during Pooja, is typically an excuse for humans to have something special to hog on.

Sweet pongal is made from rice, jaggery and optionally moong dal, boiled soft with excess water, mashed up with ghee and milk. 

The simplest version of this is with just rice, jaggery and ghee. But I always prefer the extra smooth texture and taste that moong dal adds to it.

Recipe

Ingredients:
Rice - 1/2 cup
Moon dal - 1/2 cup (you can omit and use just 1 cup of rice for the recipe)
Turmeric powder - 1 pinch
Ghee - 1 tbsp
Jaggery (shredded) - 3/4 cup (you can go upto 1 cup if you prefer your pongal sweeter)
Cardamom seeds (crushed) - 1/4 tsp
Milk - 1/2 cup (optional)

For garnishing: Ghee - 1tbsp
Cashews - a few split
Raisins - a few

Method:

Wash the rice and dal thoroughly. For this recipe I used 3 to 3 1/2 cups of water. Add a pinch of turmeric and ghee.

Pressure cook for about 1-2 whistles.

When the cooker has cooled down, mash the cooked rice and dal well and add the jaggery, mix well. 

Add cardamom and a bit of milk to make it a little runny.

Heat a tablespoon of ghee in the tadka maker and add the cashew when hot, temper the cashew until golden brown and turn off the flame. Watch out, as the ghee tends to heat very quickly and char the cashews black in to time.

Add the raisins to the tadka, and give it a whirl before adding to the pongal.

Now hot yummy pongal is ready to be served. 


Verdict: This is mostly a preference based dish. Some love it, some do not mind it, some just do not like anything sweet. At my home, only my elder daughter and parents love pongal, payasam etc. But if you are one to love pongal, this recipe will certainly be to your taste. Do try it out!

Tuesday 13 October 2020

Lemon yoghurt chicken


I personally love the quick recipes. I mean who doesn't? The fewer the ingredients, and lesser the processing, the more authentic the taste is. Especially the Indian spices overpower the taste of the vegetable or the chicken that is cooked in the gravy. So when there is an opportunity to make simple gravy recipes like Khadi, dal, I just jump on them. This is one such simple easy to cook and yummy recipe. 

I looked up online thinking there must be something simple like the chinese lemon chicken and then came across this Indian version of the same. I decided adapt this recipe for a Sunday lunch. I made coconut milk rice, this lemon yoghurt chicken and rasam and the entire meal was cooked in less than an hour. 

Tangy chicken goes well with fried rice or pulav, while the less spicy rich cashew/coconut based gravies go well with Biryani. So for the coconut milk rice recipe, I decided to pair it with this tangy spicy yoghurt based chicken gravy. 

Recipe (Serves 4)

Ingredients:
Chicken (marinated in curd and spices for an hour) - 500g (see note)
Olive oil - 2 tbsp 
Curry leaves - 8-10
Cumin powder - 1 tsp
Chilli powder - 1 tsp
Coriander powder - 1tsp 
Garam masala - 1/2 tsp 
Crushed Ginger - 1 tsp
Crushed Garlic - 1 tsp
Lemon juice - 1 lemon (approximately 1 tbsp) 
Salt - to taste 
Yoghurt, smooth and beaten - 1 cup 

Note: I used frozen marinated chicken. I buy the chicken, clean it, mix up the spices in the curd marinade and let it sit fo an hour or so on the kitchen top. Then pop it into the freezer for use within the next week or so. 

Method:
Pressure cook the chicken after it has thawed for the usual time.

Heat about 1 tbsp oil in a heavy bottomed kadai. When the oil is hot, add the curry leaves. Add the boiled chicken pieces, keeping the stock aside. 
Add the spices (cumin, chilli, coriander, garam masala, ginger, garlic, salt) and let them mix well with the chicken. Add another tbsp of oil. Let the chicken fry until it is aromatic. 

Finally add the chicken stock from the cooker, the beaten yoghurt and blend well. Add lemon juice and mix again. Cover and cook for about 6-7 minutes until the raw smell of the yoghurt dissipates. 

Tangy, thin chicken gravy is ready to serve. 


Verdict: Personally I prefer thin gravies with rice. However this does taste good with roti as well. This just took about 10 minutes to cook and the preparation time was about 15 minutes. 
 

Sunday 11 October 2020

Coconut-milk Pulav (Mom's recipe)


The aroma of coconuts wafting from the kitchen bring back fond memories of childhood. This isn't comfort food, but it is incredibly comforting to walk down memory lane, triggered by the culinary senses, especially those that remind me of mom. This is her hit coconut milk rice - thengai paal saadam that was made on special occasions and sometimes just on Sundays. I just tweaked it a little bit to use basmati rice and cooked it in the kadai rather than in the cooker like mom used to. And every time I cook this, I share some incident or memory with the kids about their grandmother, chewing the cud of by-gone days. It is a fond way to remember. 

Recipe (serves 4) 

Ingredients:

Basmati rice - 1 cup
Coconut milk - 2 cups
Carrots, green peas, beans - 1 cup
Curry leaves - 8-10
Cumin - 1 tsp
Green chillies - 3, slit lengthwise
Onion - 1 small
Ginger Garlic paste - 2 tsp
Turmeric powder - 1 pinch
Salt - to taste
Garam masala - 1 tsp 
Coconut Oil - 1 tbsp, + as needed for frying
Ghee - 1 tbsp

Garnishing:
Ghee - 1 tbsp
Cashews - 10 split

Coriander leaves, finely chopped - 1tbsp 

Method:

Wash and soak the basmati rice for about 15-20 minutes. 
Heat oil in a heavy bottomed pan. When the oil is hot, add cumin seeds, curry leaves and green chillies. When the seeds start to sputter, add onions and ginger garlic paste. Add the turmeric powder and fry until the onions are transparent. Add the vegetables, garam masala and stir fry. Add more oil if needed and fry until the vegetables feel slightly soft. 

Drain the water from the basmati rice. Add it to the fried vegetables, and continue frying for a couple of more minutes until the rice is aromatic. 

Add the coconut milk and salt to taste. Mix well and when it comes to a boil, close the lid and reduce the flame. 

Let the rice cook for about 5-7 minutes. Lift the lid and check until the rice is cooked, and there is no water in the pan. 

Switch off the flame, splash about 1 tbsp of ghee on top and leave the rice undisturbed for a few minutes. 

Fold in the rice in the pan once to mix the ghee well.

In a tadka pan, add 1 tbsp ghee and the split cashews and heat until the cashews turn golden brown. Turn off the flame and continue frying the cashews. Add it to the cooked coconut milk rice and garnish with coriander leaves on top. 

Yummy coconut milk rice is ready to serve.

Verdict: The rice is best paired with some spicy curry - channa/rajma masala, kofta curry, chicken gravy are some combinations. 

Saturday 5 September 2020

Triple Chocolate Brownies - one bowl recipe

There is no such thing as too much chocolate. Double chocolate, chocolate fudge, chocolate truffle, triple chocolate brownies and Death by Chocolate cake and DBC ice-cream etc. etc. are testimony to that sentiment. Don't you agree?

A couple of months back after baking, the chocolate truffle brownies, since I had run out of baking chocolate I went ahead and purchased some Dark, Milk and White chocolate just to keep some on hand. To be honest most of the milk chocolate is already gone, thanks to all the chocolate lovers at home 😋 

When the kids asked to bake something this weekend, I decided I will put the baking chocolate to good use. There are these most dependable no-fail recipes at joyofbaking.com. I have baked a lot of goodies from here, especially brownies. This recipe for Triple Chocolate brownies has been on my bake-again list for a long while now. It is a one-bowl recipe and very simple to bake. So the choice was made. 

Recipe (makes 25 brownies)

Ingredients:

Raw peeled Hazelnuts - 1 cup (optional) see note
Dark chocolate - 115g
Unsweetened dark chocolate - 30g
Cold unsalted butter, diced - 1/2 cup (113g)
Cocoa powder - 2 tbsp
Granulated while sugar - 1 cup
Vanilla extract - 1tsp 
Eggs - 3 large at room temperature
Flour - 3/4 cup
Salt - 1/4 tsp

Note: I used 1/4 cup of dark chocolate chips instead of the hazelnuts. 

Method:

If using hazelnuts, roast them for about 15 mins until slightly brown and fragrant. Let them cool down and chop them coarsely. 

My kids do not prefer nuts in baked goods and hence I omitted them. I used 1/4 cup of chocolate chips instead.

Preheat the oven to 180 degrees C. Line a 8" square pan with parchment paper. Butter the parchment paper and keep aside. 

Chop the dark chocolate and unsweetened chocolate finely and add them to the diced butter in a glass bowl. Microwave on low power at 30 second intervals until the butter and chocolate have melted. It is important to keep mixing the butter and chocolate for every iteration of microwaving else the chocolate can get overheated. 

Mix in the cocoa powder and sugar, followed by the vanilla extract. I just used a wire whisk this time. I did not use my hand mixer. 

Add the eggs one at time and mix in until incorporated fully. Finally add the flour and salt and mix. 

If using the nuts or chocolate chips, add in at this stage. 

Pour the batter into the prepared pan. Use a silicone spatula to smooth out the top. 

Bake for about 20-25 mins. At the 20 min mark, check if a toothpick inserted comes out with a few moist crumbs and stop if done. 

I felt I had over-baked the brownies. I will be sticking to 20 mins next time. 


Let the brownies cool down in the pan for about 5-10 mins and then place on a wire rack to cool. 

Slice them only when they are completely cool about an hour or so. Tough I know with kids hovering around asking if we can slice, but mommies, please stand your ground. It is worth it. 😈


Slice the brownies into 25 squares. I make 25 small squares instead of 16 large squares as it makes nice bite sized pieces. 

Verdict: About half of these were gone on the day they were baked and the rest the second day. Need I say more? 😊

Thursday 3 September 2020

Peanut butter cups


The COVID-19 situation has pushed us out of our comfort zone. Working from home has become the new normal, correction - working from home and schooling kids from home has become the new normal. And that brings about plenty of challenges. Juggling meetings while helping kids with their online classes and their homework, fixing up their meals, answering the door and for a while managing without domestic help, it is these challenges that push us to innovate. As they say, necessity is the mother of invention. 

When the lockdown was imposed, we all stocked up on essentials. I typically have supplies to last a couple of weeks, but a month's lockdown and anticipated further extensions, led me to stock up on atleast two-three months worth of provisions. And I was very apprehensive of not having the children's favourites on hand. Making my little one eat is a challenge. So I really needed to stock up on some of their favourite eats, to I could cater to their whims and fancies. 

Well for starters, I started making bread at home once a week, and kept jam, butter, nutella and other spreads handy. I had pasta sauce and a couple of pasta varieties ready in stock. Not to mention instant noodles were also in stock. 

As folks know with the stock piling and demand for packaged food increasing I was unable to get peanut butter of my choice - American Garden Creamy Peanut butter 

I went in for a different brand, considering natural unsweetened peanut butter would be a good alternative, but my elder one who is usually very adventurous with food, did not like it one bit. 

So I had to find another way to consume it. I found this recipe while looking for something to do with the that box. 

Why not make myself a nice treat with that peanut butter? It will certainly save me some time breakfast. 


Recipe (Makes about 16)

Ingredients:  
Natural creamy peanut butter (unsweetened) - 1 cup (400g) (I used Alpino peanut butter)
Organic Coconut butter - 175 g (I used Dhatu organic coconut butter)
Cocoa powder - 5 tbsp 

Method:
Line muffin cups with aluminium foil liner or paper cupcake liners. Or you can use silicone moulds, and there is no need to line the moulds.

Melt the coconut butter in a microwave safe bowl in 20 second intervals until completely melted. I melted it in the bottle in the microwave. 

Transfer the melted coconut butter to a large bowl. Stir in the peanut butter and cocoa powder. 

Using a tablespoon measure, scoop two tablespoon onto the prepared muffin cups. 

Tap the muffin cups just a bit to settle the mix, smooth on top. Pop them in the fridge for a couple of hours to set. 

Enjoy them when set. 

Store them in airtight containers in the fridge. 

One butter cup is about 215 calories. Just unmould it from the refrigerator and enjoy a quick healthy breakfast. 

Verdict: I loved the creamy richness of these butter cups. It was bitter as I had not added a sweetener, but you can add maple syrup for regular butter cups or a sugar-free sweetener as indicated in the original recipe if you want it as a keto snack. On the other hand you can use sweetened peanut butter. I have not tried the sweet version of this yet. Do let me know how it works. 

Monday 31 August 2020

Prawn Fry


I remember the first time I had prawns when I was a little girl at my grandmother's house. Growing up inlands, I was not exposed to sea-food at all, except when I visited my grandmother at Chennai. It was a Sunday special for them to head to the wet market and purchase fish/prawns. I had no idea what prawns looked like or tasted like. It was a couple of hours before they got back and another couple of hours before they could clean it well to start cooking. Those were small prawns so it took a lot effort to clean and when cooked they rolled up to the size of buttons. I found that fascinating and not to mention yummy.
 
At that time, I did not realize that it would be more than a couple of decades before I started cooking prawns myself. And from the first experience, I was not looking forward to the cumbersome cleaning that was involved.  

One evening my husband had ordered jumbo prawns (cleaned and deveined) from an online store and instead they sent small ones without deveining. He patiently started cleaning them and got tired mid-way and left the deveined prawns right on the kitchen top and uncleaned ones in the sink and scooted off. I stepped in to cook dinner and could not get to the sink without finishing up what he started and cleaning the sink and kitchen top as well. It took me a couple of hours to get through the whole chore and obviously dinner was delayed way beyond. I was furious with the online store and with my husband. 😡

But all that effort is worth it when the prawns are cooked 😉. I personally prefer prawns soup or prawn curry based on coconut milk, but somehow my daughters prefer the fry. As expected their preference wins 😁. But hey! When the kids polish off their bowls and look satiated that is a reward in itself right? So no complaints on that front. 

Anyways to the recipe. This recipe is something I remember having seen on facebook. Based on what I remembered from that video, I tried it out and it turned out well, I just kept at it since then only varying the spices level. 

Recipe (serves 4)

For garnishing:
Curry leaves - 4-5
Cumin seeds - 1 tsp 
Green chillies (slit) - 2 (optional, I always leave this out)

For the fry:
Onions (finely chopped) - 1 medium
Tomato (finely chopped) -  1 small 
Salt - to taste
Turmeric powder - 1/4 tsp
Chilli powder - 1/2 tsp 
Cumin powder - 1/4 tsp
Ginger - 1 inch piece (mashed well)
Garlic - 4-5 cloves (mashed well)

Prawns (medium sized about 25-30 in number) - 500g

Oil - for frying (I prefer olive oil or coconut oil)

Method: 

Heat some oil in a frying pan, add the curry leaves, cumin seeds and green chillies. When the cumin turns colour, add the onions and turmeric powder. Fry until the onions turn transparent and then start shrinking. Add the tomatoes and mashed ginger and garlic. If you prefer to use the garlic-ginger paste, you can use about 1 tsp of the paste. 

Fry until the tomatoes turn into a nice pulpy consistency. Add a little more oil if needed. Finally add the chilli and cumin powder until the whole mix comes together and the oil starts to separate. 

At this stage add the cleaned deveined prawns and toss the fried paste around the prawns. Fry for a while (2-3 mins) and watch in fascination as they shrink and start shrivelling. 

Close the lid of the frying pan and let it sit for a few minutes. The prawns release water. There is no need to add any more water. I usually leave the lid closed for about 3-4 mins. Do not overcook the prawns. Open the lid and let the water evaporate. 

Garnish with coriander leaves and serve hot with rice or roti. 

Tip: Whenever I fry something, I feel a lot of the spices and gravy get stuck to the pan and go straight down the sink when washed. My mom used a trick to make use of the remnants of gravy in the pan and I adopted the same more for the taste. Take a couple of spoons of white rice and toss it into the kadai and scrape off the oil and spices and gravy stuck to the frying pan. Now your pan is clean and you have about 1/2 cup of flavoured and yummy rice. My daughter loves this. 

Verdict: I have standardized the above recipe as I have cooked it several times. It turns out mildly spiced and I prefer it with olive oil as opposed to coconut oil. You can use the oil of preference, and adjust the spices as per your taste. 

Saturday 29 August 2020

Banana Bundt cake


Banana and chocolate make delectable baked goods. I always keep a couple of over-ripe bananas in the freezer for that quick sweet craving, either pancakes for breakfast or a delicious cake for an evening treat. 

I made this on my dad's birthday and the kids were super excited about having him cut the cake in the evening. 

The recipe is from Divya's blog


Recipe (serves 6) 

Ingredients:
Flour (maida) - 3/4 cup
Baking powder - 1 1/2 tsp
Baking soda - 1/4 tsp
Salt - 1/2 tsp
Banana - 1 large very ripe
Sugar - 3/4 cup
Egg - 1 (at room temperature)
Butter - 1/4 cup
Buttermilk - 50ml (see note)
Vanilla extract - 1 tsp

Note: Buttermilk can be made by taking 50 ml of milk, removing 1tsp from it and replacing it with 1tsp of vinegar. Let it sit for 10 mins.
Optionally, you can use 25ml of curd beaten and added to 25 ml of milk and let it sit for about half an hour. 

Method:

Preheat oven to 180 degrees C.

Grease a bundt pan (6 cup). It is a good idea to grease well with butter and then sprinkle some flour on the butter. That way the cake releases easily from the bundt pan.

Sift the flour, baking powder, salt and baking soda in a bowl. 

Make sure the banana is really ripe and mash it using a blender. 

Add the sugar and egg to the mashed banana and beat well. Then add the butter and beat for another minute until the mixture is thick and creamy. 

Add the buttermilk and vanilla extract and beat until just blended. 

Pour the wet ingredients into the dry ingredient bowl and fold in until just blended. Make sure not to over mix as it will result in a tough cake. 

Scoop into the bundt pan and smooth out the top evenly. 

Bake for about 40mins or until the top turns golden brown and the cake passes the skewer test.

Remove and let it cool completely before you try to turn the pan and release the cake. 


Verdict:
Quick and easy recipe for a delicious evening snack. I would have preferred it a little less sweet. I will be trying it out with 1/2 cup of sugar instead of 3/4 cup next time. 


Some pictures from the celebrations my daughters had set up for my father. Love of the children is just immeasurable. Happy Birthday Appa!


Saturday 1 August 2020

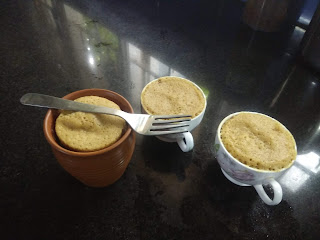
Microwave Mug Cake - A quick something for that intense sweet craving


When we were growing up Mom used to give us pottukadalai (roasted Bengal gram) with sugar/jaggery. That was our quick fix for a sweet craving. I still keep a box replenished with pottukadalai and jaggery mix for folks at home to munch on.  

But nowadays kids are spoilt for choices, be it TV or food. They want something new every time. So anytime I come across some quick recipe for kids snacks I make sure to try it out so I can be ready to assuage one of those intense cravings and "I don't want this all the time, it is so boring" whines. 

I don't recollect the original recipe, I only remember that the recipe was for just one mug cake. 

What follows is the recipe I have standardised for my use. I typically make 4. The kids down 1 each as soon as it is made and save the other one for later. 

Recipe (makes 4 in 180 ml china cups or kullads)


Ingredients:
1 egg (if you want eggless, please check the substitution below)
1/4 cup (4 tbsp) - milk
2 tbsp - butter
1/4 cup (4 tbsp) - whole wheat flour
1/4 cup (4 tbsp) - sugar
1 tsp - vanilla essense
1 tsp - baking powder

Topping (optional)
Chocolate chips or chopped chocolate.

Method:
Melt the butter in one of the mugs/cups.
Whisk the egg, milk, and sugar in a bowl with a fork. Add the melted butter and whisk again. Add the flour, baking powder and vanilla essence and make a smooth paste.

If adding chocolate chips or chopped chocolate, add them to the batter at this stage.

Grease four china cups/kullads with a little melted butter.

Spoon the batter to fill the cups upto half way. Microwave the 4 cups/kullags for 1.5 minutes at full power. Insert a toothpick to make sure the mug cake is cooked.

Substitute for Eggless variant:
Instead of the egg listed above, you can substitute with one of the following:
a. grind a teaspoon of flax seeds
b. grind half a ripe banana robusta
The microwave time may need to be increased by about 30 seconds for the eggless variant. Be sure to check in between so the cake is not overcooked.

Substitute for Chocolate mug cake:
Instead of 4 tbsp of whole wheat flour, use 3 tbsp of whole wheat flour and 1 tbsp of cocoa powder (if using Dutch processed cocoa powder, add a tsp of vinegar to the recipe)


Verdict: A little too eggy for my taste, but the kids do not mind.  

\

Wednesday 29 July 2020

White bread with Tangzhong method


Baking with yeast has finally been conquered. Checkout the softest and spongiest milk bread ever eaten in our household and to top it all home-made. What better joy than seeing your efforts bear fruit? 

Baking a whole wheat loaf is not quite there yet. But I am trying... hang on... In the meanwhile, check this recipe out... 

I came across this recipe on Baking Partners, but at that time I did not have this wonderful yeast, so I missed that challenge. I finally made it when I got my packet of good yeast. I did not understand what the Tangzhong would do and how it would help, but apparently it acts as a dough enhancer. It produces really soft and spongy bread. 

Recipe source Christine's recipes
Ingredients for tangzhong: 

50gm/ 1/3 cup bread flour
250ml/ 1cup water (could be replaced by milk, or 50/50 water and milk)
Formula of  1 parts of flour with 5 parts of water heat at 65 c/ 150F

Ingredients for 
bread:

350gm/ 2½ cups bread flour (I used Maida)

55gm/3tbsp+2tsp caster sugar

5gm/1tsp salt
56gm egg (equals to 1 large egg) ( If you want eggless, increase amount of milk or add a cooked potato) 
7gm/1tbsp+1tsp milk powder (to increase fragrance, optional)
125ml/ ½cup milk
120gm tangzhong (use half of the tangzhong you make from this recipe)
5 to 6gm/2 tsp instant yeast
30gm/3tbsp butter (cut into small pieces, softened at room temperature)

Method of making Tangzhong:
  1. Mix flour in water well without any lumps. Cook over medium-low heat, stirring consistently with a wooden spoon, whisk or spatula to prevent burning and sticking while you cook along the way.
  2. The mixture becomes thicker and thicker. Once you notice some “lines” appear in the mixture for every stir you make with the spoon. It’s done.  If you want to check the temperature of tangzhong it is 65 C/149 F.Remove from heat.
  3. Transfer into a clean bowl. Cover with a cling wrap sticking onto the surface of tangzhong to prevent from drying up. Let cool. The tangzhong can be used straight away once it cools down to room temperature.  Just measure out the amount you need. The leftover tangzhong can be stored in fridge up to a few days as long as it doesn't turn grey. If so, you need to discard and cook some more. (Note: The chilled tangzhong should return to room temperature before adding into other ingredients. )
Method of making bread:

  1. Combine all dry ingredients: flour, salt, sugar and instant yeast in a bowl. Make a well in the center. Whisk and combine all wet ingredients: milk, egg and tangzhong, then add into the well of the dry ingredients. Knead until you get a dough shape and gluten has developed, then knead in the butter. Mind you, it’d be quite messy at this stage  Keep kneading until the dough is smooth, not sticky and elastic. To test if the dough is ready, you might stretch the dough. If it forms a thin “membrane”/ window pan test, it’s done. The time of kneading all depends on how hard and fast you knead.
  2. Knead the dough into a ball shape. Place in a greased bowl and cover with a wet towel or cling wrap. Let it proof till it's doubled in size, about 40 minutes (Note: the time will vary and depends on the weather. The best temperature for proofing is 28C/ 80 F.) During summer in Bangalore, it only takes 30-35 minutes for the first rise.
  3. Transfer to a clean floured surface. Deflate and divide the dough into eight equal portions. Knead into ball shapes. Cover with cling wrap, let rest for 15 minutes.
  4. Grease and prepare a 8" square pan. If you want to make a simple white bread roll without filling you can do that at this time. Roll each ball of dough into an oval shape. Fold the shorter edges of the oval and form a square roughly. Turn it over and roll it again into a rectangle or oval. Turn it over and then start rolling from the wider side of the two shorter sides of the rectangle. Place it in the prepared pan as shown in the picture below. 
  5. Leave it for the 2nd round of proofing, about 40 minutes, or until the dough rises up to 3/4 of the height of the tin inside.

  6. Brush some milk on the surface gently. Bake in a pre-heated 180C (350F) ovenfor 35 to 40 minutes. I baked for 35 minutes. Remove from the oven and tin. Transfer onto a wire rack and let cool completely. Slice to serve or place in an airtight plastic bag or container once it's thoroughly cooled.


Verdict: This is by far the best bread we have ever eaten at home. I first made this about 5 years ago, and Mom was thrilled at the sponginess of this fresh loaf. When I made this recently, both my daughters downed large chunks at breakfast and tea times. 

My daughter just slathered nutella and ate the chunk. For my husband, I just made a simple channa sandwich after toasting a couple of slices and stuffing some channa masala between.